Measurement of the bevel angle
Bevel angle - angle formed by the end face of the workpiece and the edge plane
∴ Due to its design features, the TapiRUS can be used in measuring the bevel angle for complex types of cuttings as well as in assessment of the welding preparation quality for welding of repairable sections of a welded joint.


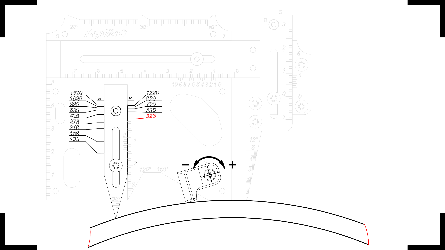
positioning the welding gauge
- Set the welding gauge at the zero position
- Pull the fillet arm 2 out of the main gauge plate 1, matching the mark with a value corresponding to the diameter of the pipe being monitored
- Fix and lock the stop position by tightening the fillet arm rivet 6.
- Position the welding gauge on the test object.
- After rearranging the pivots in the groove located on the right side of the welding gauge, adjust them until they come into contact with the inspected object.
- Lock the pivots in this position as shown by the illustration

˟ the parameter measured during the monitoring process is highlighted in red
measurement taking
- Adjust the linear member 3 so that the taper gauge 5 is above the point corresponding to the beginning of the bevel of the edge.
- Lower the top High-Lo arm 4 until the taper gauge 5 makes contact with the surface of the welded joint.
- From the horizontal scale W, take the readings of the parameter w, subsequently from the vertical scale H –take the readings of the parameter h for т. 1. т. 2
- Move the linear member 3 so that the taper gauge 5 is the point corresponding to the end of the angle of bevel.
- Lower the top High-Lo arm 4 until the taper gauge 5 makes contact with the surface of the weld.
- On the horizontal scale W, take the readings of the parameter w, subsequently from the vertical scale H – take the readings of the parameter h for т. 2.
- To determine the desired parameter H, use the calculator as illustrated